For quick and easy fixing of PV modules on vertical façades.
PV clip system
The fischer PV clip impresses with its versatility and functioning on diverse anchoring surfaces. Even demanding requirements on the façade are met. Constraints, as encountered with conventional PV clamps, are avoided. The PV modules are securely and mechanically attached thanks to the fischer PV clip. The concealed fixing opens the possibility of realizing comprehensive façade designs.
The practical sliding nut enables quick and constraint-free installation.
The simple stainless steel plug-in system is highly weather-resistant thanks to the high corrosion protection class III.
Suitable for all types of framed PV modules with mounting holes.
The system enables fixing to various wall substrates and also to different substructures.
The modular system enables the construction of contiguous module arrays with adjustable joint sizes.
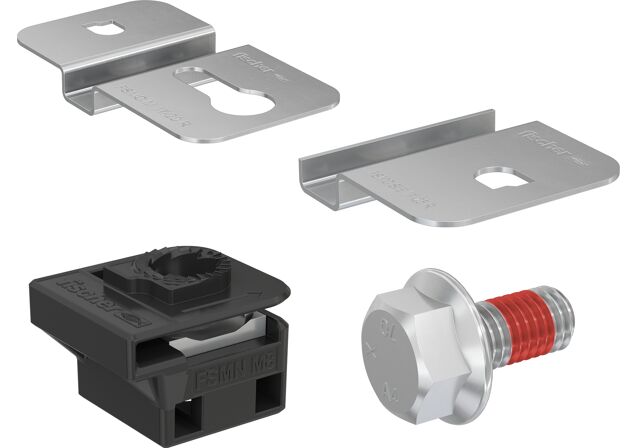
The start/end clip can be used both as a start clip and as an end clip, thus minimizing the number of products required.
Pre-applied thread locker on screws.
Integrated potential equalisation.
Properties
Stainless steel with high corrosion protection class III
Aplikimi dhe leja (autorizimi)
Applications
PV clip for mounting PV modules on façades
Building materials
Various building substrates (concrete, wood, masonry, steel, trapezoidal sheet metal)
Various substructures (aluminum profiles, steel profiles, wooden battens)
Detajet (materialet e ndërtimit, ngarkesat, etj.) të çdo miratimi të disponueshëm zbatohen. Dokumentet e mëtejshme mund të gjenden në Qendra e shkarkimit.
Manuali i montimit
Functionality
First module:
Slide at least four sliding nuts FSMN II R onto the mounting holes on the back of the module frame.
Apply a drop of threadlocker before screwing in the serrated screws.
Install at least two start/end clips FSMC S/E with one fischer serrated screw each on one side of the module.
Install at least two middle clips FSMC M with one fischer serrated screw each on the opposite side of the module.
Fix the start/end clips FSMC S/E to the building substrate using plugs, wood screws etc..
Fix the middle clips FSMC M to the building substrate using plugs, wood screws etc..
Middle modules:
Slide at least four sliding nuts FSMN II R onto the mounting holes on the back of the module frame.
Apply a drop of threadlocker before screwing in the serrated screws.
Screw the fischer serrated screws into the sliding nuts on one side of the module.
Install at least two middle clips FSMC M with one fischer serrated screw each on the opposite side of the module.
Attach the screws to the previous module using the lock-and-key principle and slide them in.
Fix the middle clips FSMC M to the building substrate using plugs, wood screws etc..
Last module:
Slide at least four sliding nuts FSMN II R onto the mounting holes on the back of the module frame.
Apply a drop of threadlocker before screwing in the serrated screws.
Screw the fischer serrated screws into the sliding nuts on one side of the module.
Install at least two start/end clips FSMC S/E with one fischer serrated screw each on the opposite side of the module.
Attach the screws to the previous module using the lock-and-key principle and slide them in.
Fix the start/end clips FSMC S/E to the building substrate using plugs, wood screws etc..